Общий каталог Widia 2017 - страница 549
Навигация
 Каталог Widia токарный инструмент 2017
 Каталог Widia трохоидальное фрезерование
 Каталог Widia техническое руководство по разверткам
 Каталог Widia фрезы со сменными пластинами 2016
 Каталог Widia достижения 2020
- Table of Contents
- Turning
- Turning • ISO Inserts
- Turning • Tools for External Turning and Internal Boring
- Turning • Tools for External Turning and Internal Boring
- Turning • Tools for Small Hole Boring
- com E1Turning • Grooving and Cut-Off
- Turning • Threading
- Indexable Milling
- Indexable Milling • Face Mills
- Indexable Milling • Chamfer Mills
- Indexable Milling • 90° Shoulder Mills
- Indexable Milling • Helical Mills
- Indexable Milling • Slotting Mills
- Indexable Milling • Copy Mills
- Solid End Milling
- Solid End Milling • High-Performance Solid Carbide End Mills
- Solid End Milling • General Purpose Solid Carbide End Mills
- Solid End Milling • High-Performance High-Speed Steel (HSS-E/PM)
- Solid End Milling • Burs
- Holemaking
- Holemaking • High-Performance Solid Carbide Drills
- Holemaking • Modular Drills
- Holemaking • Indexable Drills
- Holemaking • Modular Drills
- Holemaking • Indexable Drills
- Holemaking • Hole Finishing
- Tapping
- Tapping Portfolio
- Index by Order Number
- Index by Catalogue Number
- Global Contacts
- Informational Icons Guide
- Material Overview • DIN
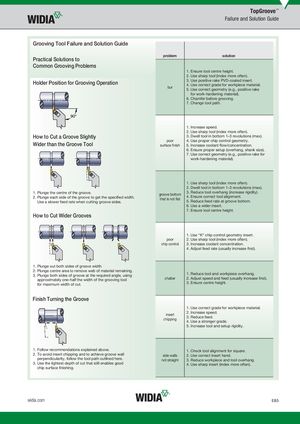
Grooving Tool Failure and Solution Guide
| problem bur | solution 1. Ensure tool centre height. 2. Use sharp tool (index more often). 3. Use positive rake PVD-coated insert. 4. Use correct grade for workpiece material. 5. Use correct geometry (e.g., positive rake for work-hardening material). 6. Chamfer before grooving. 7. Change tool path. |
| poor surface fi nish | 1. Increase speed. 2. Use sharp tool (index more often). 3. Dwell tool in bottom 1–3 revolutions (max). 4. Use proper chip control geometry. 5. Increase coolant fl ow/concentration. 6. Ensure proper setup (overhang, shank size). 7. Use correct geometry (e.g., positive rake for work-hardening material). |
| groove bottom that is not fl at | 1. Use sharp tool (index more often). 2. Dwell tool in bottom 1–3 revolutions (max). 3. Reduce tool overhang (increase rigidity). 4. Ensure correct tool alignment. 5. Reduce feed rate at groove bottom. 6. Use a wider insert. 7. Ensure tool centre height. |
| poor chip control | 1. Use “K” chip control geometry insert. 2. Use sharp tool (index more often). 3. Increase coolant concentration. 4. Adjust feed rate (usually increase fi rst). |
| chatter | 1. Reduce tool and workpiece overhang. 2. Adjust speed and feed (usually increase fi rst). 3. Ensure centre height. |
| insert chipping | 1. Use correct grade for workpiece material. 2. Increase speed. 3. Reduce feed. 4. Use a stronger grade. 5. Increase tool and setup rigidity. |
| side walls not straight | 1. Check tool alignment for square. 2. Use correct insert hand. 3. Reduce workpiece and tool overhang. 4. Use sharp insert (index more often). |
Practical Solutions to
Common Grooving Problems
Wider than the Groove Tool
How to Cut Wider Grooves
1. Plunge out both sides of groove width. 2. Plunge centre area to remove web of material remaining. 3. Plunge both sides of groove at the required angle, using approximately one-half the width of the grooving tool for maximum width of cut.
Finish Turning the Groove
chip surface fi nishing.