Каталог Stellram фрез со сменными пластинами - страница 164
Навигация
 Каталог Stellram твердосплавные цельные фрезы
 Каталог Stellram токарный инструмент
 Каталог Stellram системы со сменными пластинами для фрезерования с высокими подачами
 Каталог Stellram высокопроизводительные фрезерные системы
 Каталог Stellram материалы и сплавы
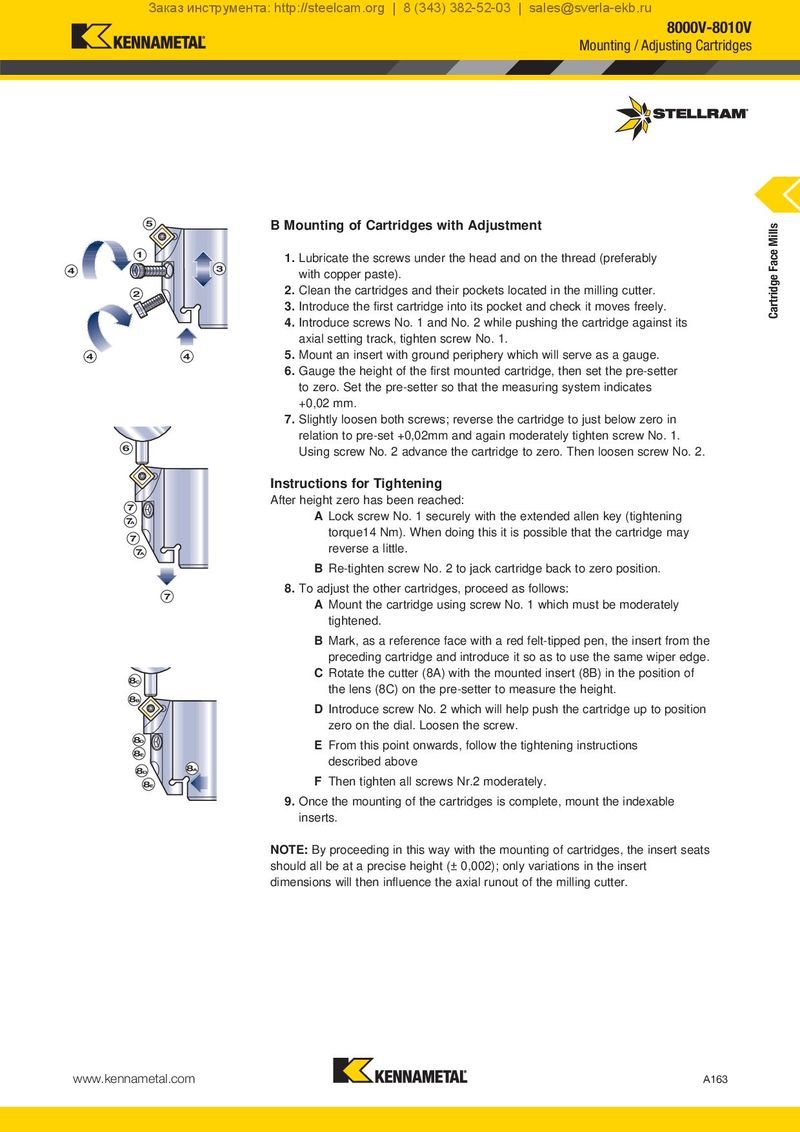
Заказ инструмента: http://steelcam.org | 8 (343) 382-52-03 | sales@sverla-ekb.ru 8000V-8010V Mounting / Adjusting Cartridges 5 B Mounting of Cartridges with Adjustment Cartridge Face Mills 1 1. Lubricate the screws under the head and on the thread (preferably 4 3 with copper paste). 2 2. Clean the cartridges and their pockets located in the milling cutter. 3. Introduce the first cartridge into its pocket and check it moves freely. 4. Introduce screws No. 1 and No. 2 while pushing the cartridge against its axial setting track, tighten screw No. 1. 4 4 5. Mount an insert with ground periphery which will serve as a gauge. 6. Gauge the height of the first mounted cartridge, then set the pre-setter to zero. Set the pre-setter so that the measuring system indicates +0,02 mm. 7. Slightly loosen both screws; reverse the cartridge to just below zero in relation to pre-set +0,02mm and again moderately tighten screw No. 1. 6 Using screw No. 2 advance the cartridge to zero. Then loosen screw No. 2. Instructions for Tightening 7 After height zero has been reached: 7A A Lock screw No. 1 securely with the extended allen key (tightening 7 torque14 Nm). When doing this it is possible that the cartridge may 7A reverse a little. B Re-tighten screw No. 2 to jack cartridge back to zero position. 7 8. To adjust the other cartridges, proceed as follows: A Mount the cartridge using screw No. 1 which must be moderately tightened. B Mark, as a reference face with a red felt-tipped pen, the insert from the preceding cartridge and introduce it so as to use the same wiper edge. 8C C Rotate the cutter (8A) with the mounted insert (8B) in the position of the lens (8C) on the pre-setter to measure the height. 8B D Introduce screw No. 2 which will help push the cartridge up to position zero on the dial. Loosen the screw. 8D E From this point onwards, follow the tightening instructions 8E described above 8D 8A 8E F Then tighten all screws Nr.2 moderately. 9. Once the mounting of the cartridges is complete, mount the indexable inserts. NOTE: By proceeding in this way with the mounting of cartridges, the insert seats should all be at a precise height (± 0,002); only variations in the insert dimensions will then influence the axial runout of the milling cutter. www.kennametal.com A163