Каталог Stellram фрез со сменными пластинами - страница 165
Навигация
 Каталог Stellram твердосплавные цельные фрезы
 Каталог Stellram токарный инструмент
 Каталог Stellram системы со сменными пластинами для фрезерования с высокими подачами
 Каталог Stellram высокопроизводительные фрезерные системы
 Каталог Stellram материалы и сплавы
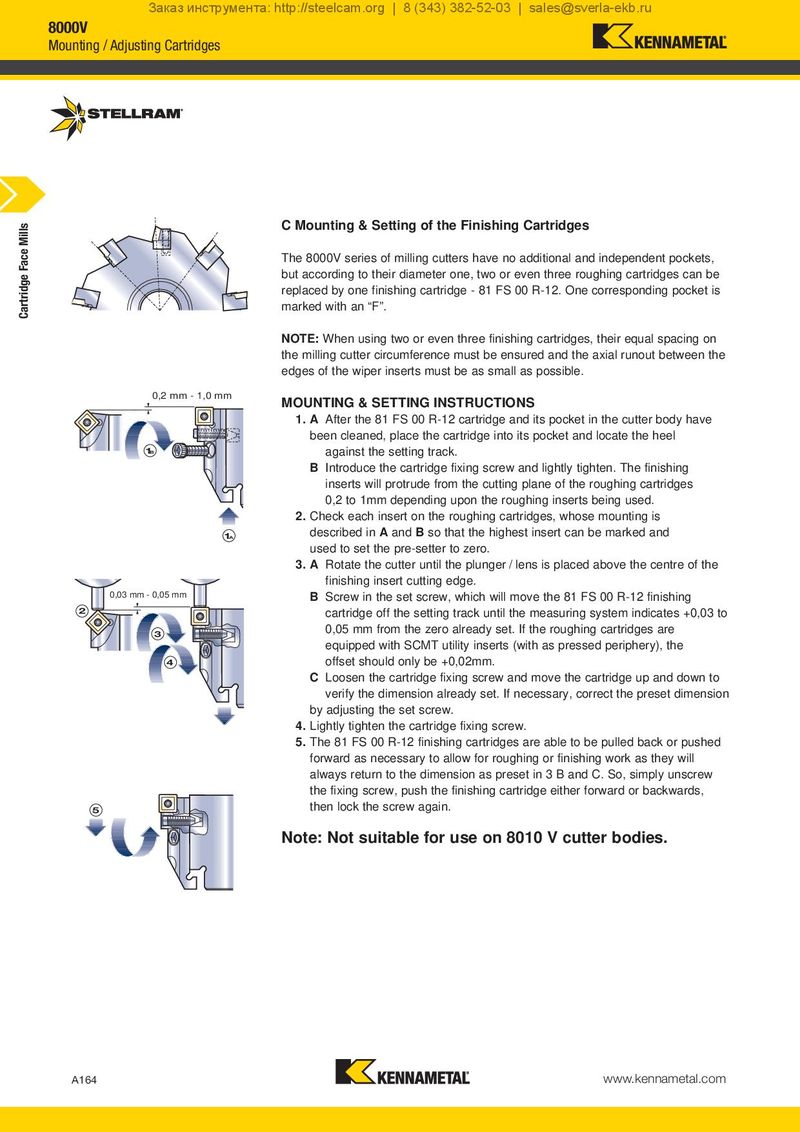
Заказ инструмента: http://steelcam.org | 8 (343) 382-52-03 | sales@sverla-ekb.ru 8000V Mounting / Adjusting Cartridges Cartridge Face Mills C Mounting & Setting of the Finishing Cartridges The 8000V series of milling cutters have no additional and independent pockets, but according to their diameter one, two or even three roughing cartridges can be replaced by one finishing cartridge - 81 FS 00 R-12. One corresponding pocket is marked with an “F”. NOTE: When using two or even three finishing cartridges, their equal spacing on the milling cutter circumference must be ensured and the axial runout between the edges of the wiper inserts must be as small as possible. 0,2 mm - 1,0 mm MOUNTING & SETTING INSTRUCTIONS 1. A After the 81 FS 00 R-12 cartridge and its pocket in the cutter body have been cleaned, place the cartridge into its pocket and locate the heel 1B against the setting track. B Introduce the cartridge fixing screw and lightly tighten. The finishing inserts will protrude from the cutting plane of the roughing cartridges 0,2 to 1mm depending upon the roughing inserts being used. 2. Check each insert on the roughing cartridges, whose mounting is 1A described in A and B so that the highest insert can be marked and used to set the pre-setter to zero. 3. A Rotate the cutter until the plunger / lens is placed above the centre of the finishing insert cutting edge. 0,03 mm - 0,05 mm B Screw in the set screw, which will move the 81 FS 00 R-12 finishing 2 cartridge off the setting track until the measuring system indicates +0,03 to 3 0,05 mm from the zero already set. If the roughing cartridges are equipped with SCMT utility inserts (with as pressed periphery), the 4 offset should only be +0,02mm. C Loosen the cartridge fixing screw and move the cartridge up and down to verify the dimension already set. If necessary, correct the preset dimension by adjusting the set screw. 4. Lightly tighten the cartridge fixing screw. 5. The 81 FS 00 R-12 finishing cartridges are able to be pulled back or pushed forward as necessary to allow for roughing or finishing work as they will always return to the dimension as preset in 3 B and C. So, simply unscrew the fixing screw, push the finishing cartridge either forward or backwards, 5 then lock the screw again. Note: Not suitable for use on 8010 V cutter bodies. A164 www.kennametal.com