Каталог Iscar токарный инструмент 2017 - страница 351
Навигация
 Каталог Iscar резьбонарезные фрезы
 Каталог Iscar инструмент для обработки алюминиевых колёс
 Каталог Iscar державки и пластины для нарезания резьбы 2022
 Каталог Iscar расточные системы 2022
 Каталог Iscar высокоточные развертки и метчики 2022
 Токарные инструменты Iscar (часть 2) 2026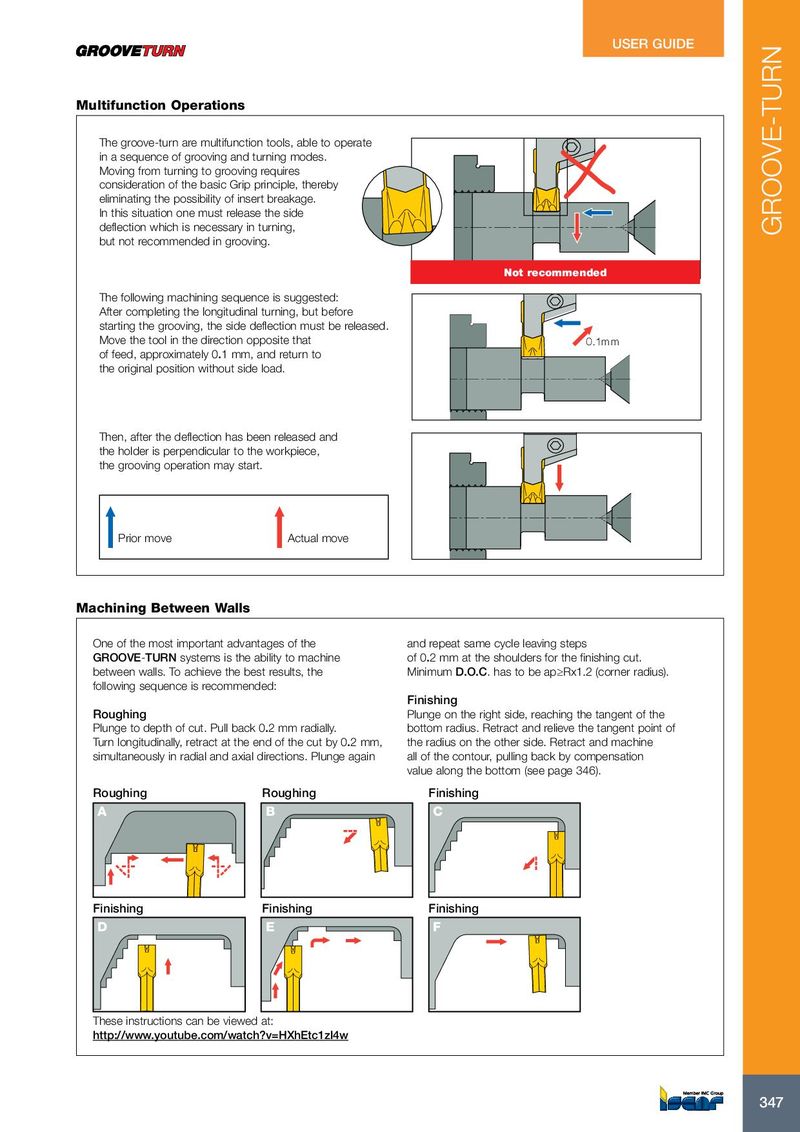
Multifunction Operations
The groove-turn are multifunction tools, able to operate in a sequence of grooving and turning modes. Moving from turning to grooving requires consideration of the basic Grip principle, thereby eliminating the possibility of insert breakage. In this situation one must release the side deflection which is necessary in turning, but not recommended in grooving. Not recommended The following machining sequence is suggested: After completing the longitudinal turning, but before starting the grooving, the side deflection must be released. Move the tool in the direction opposite that 0.1mm of feed, approximately 0.1 mm, and return to the original position without side load.
Then, after the deflection has been released and the holder is perpendicular to the workpiece, the grooving operation may start.
Prior move Actual move
Machining Between Walls
| One of the most important advantages of the | and repeat same cycle leaving steps |
| GROOVE-TURN systems is the ability to machine | of 0.2 mm at the shoulders for the finishing cut. |
| between walls. To achieve the best results, the | Minimum D.O.C. has to be ap≥Rx1.2 (corner radius). |
| following sequence is recommended: | |
| Finishing | |
| Roughing | Plunge on the right side, reaching the tangent of the |
| Plunge to depth of cut. Pull back 0.2 mm radially. | bottom radius. Retract and relieve the tangent point of |
| Turn longitudinally, retract at the end of the cut by 0.2 mm, | the radius on the other side. Retract and machine |
| simultaneously in radial and axial directions. Plunge again | all of the contour, pulling back by compensation |
| value along the bottom (see page 346). | |
| Roughing | Finishing Roughing |
| A | C B |
| Finishing | Finishing | Finishing |
| D | E | F |
These instructions can be viewed at: http://www.youtube.com/watch?v=HXhEtc1zl4w