Общий каталог Ingersoll 2011 - страница 682
Навигация
 Общий каталог Ingersoll 2016 - 2017
 Общий каталог Ingersoll 2014
 Каталог Ingersoll инструмент для нарезания резьбы
 Общий каталог Ingersoll 2013 - 2014
 Каталог Ingersoll новинки 2021
- 0003 Table of Contents
- 0006 End Mills
- 0064 Long Edge
- 0104 0Deg Face Mills
- 0160 Face Mills
- 0202 Slotters
- 0218 Form Mills
- 0236 Profile Mills
- 0302 Milling Tech
- 0384 Solid Carbide
- 0448 Solid Carbide Tech
- 0474 Holemaking & Thread Milling
- 0666 Holemaking & Thread Milling Tech
- 0720 Innofit Top On Toolholders
- 0738 HSK Toolholders
- 0774 CAT Toolholders
- 0796 BT Toolholders
- 0816 Adaptions Accessories
- 0872 Turning Inserts
- 1024 Turning Holders
- 1144 Turning Tech
- 1174 Threading Inserts
- 1242 Threading Holders
- 1256 Threading Tech
- 1268 T-Clamp
- 1344 T-Clamp Tech
- 1376 T-CAP
- 1388 T-CAP Tech
- 1394 Product_Index
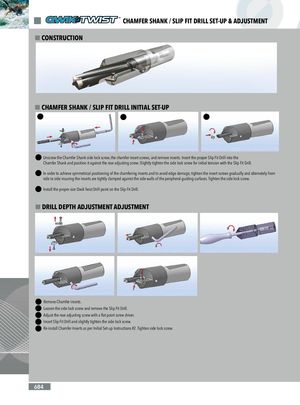
CHAMFER SHANK / SLIP FIT DRILL SET-UP & ADJUSTMENT n CONSTRUCTION n CHAMFER SHANK / SLIP FIT DRILL INITIAL SET-UP 1 2 3 1 Unscrew the Chamfer Shank side lock screw, the chamfer insert screws, and remove inserts. Insert the proper Slip Fit Drill into the Chamfer Shank and position it against the rear adjusting screw. Slightly tighten the side lock screw for initial tension with the Slip Fit Drill. 2 In order to achieve symmetrical positioning of the chamfering inserts and to avoid edge damage, tighten the insert screws gradually and alternately from side to side insuring the inserts are tightly clamped against the side walls of the peripheral guiding surfaces. Tighten the side lock screw. 3 Install the proper size Qwik Twist Drill point on the Slip Fit Drill. n DRILL DEPTH ADJUSTMENT ADJUSTMENT 1 Remove Chamfer inserts. 2 Loosen the side lock screw and remove the Slip Fit Drill. 3 Adjust the rear adjusting screw with a flat point screw driver. 4 Insert Slip Fit Drill and slightly tighten the side lock screw. 5 Re-install Chamfer Inserts as per Initial Set-up Instructions #2. Tighten side lock screw. 684