Каталог Widia инструментальная оснастка - страница 1099
Навигация
 Каталог Widia достижения 2021
 Брошюра Widia решения для аэрокосмической промышленности
 Брошюра Widia техническое руководство
 Каталог Widia токарный инструмент 2020
 Каталог Widia цельные концевые фрезы
 Каталог Widia техническое руководство по разверткам
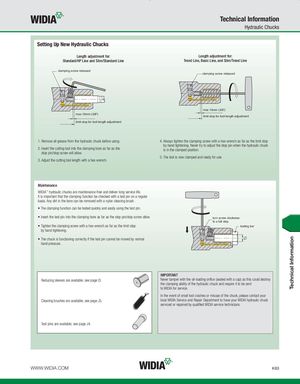
Technical Information Hydraulic Chucks Setting Up New Hydraulic Chucks Length adjustment for: Length adjustment for: Standard/HP Line and Slim/Standard Line Trend Line, Basic Line, and Slim/Trend Line clamping screw released clamping screw released max 10mm (3/8") max 10mm (3/8") limit stop for tool-length adjustment limit stop for tool-length adjustment 1. Remove all grease from the hydraulic chuck before using. 4. Always tighten the clamping screw with a hex wrench as far as the limit stop by hand tightening. Never try to adjust the stop pin when the hydraulic chuck 2. Insert the cutting tool into the clamping bore as far as the is in the clamped position. stop pin/stop screw will allow. 5. The tool is now clamped and ready for use. 3. Adjust the cutting tool length with a hex wrench. Maintenance WIDIA™ hydraulic chucks are maintenance-free and deliver long service life. It is important that the clamping function be checked with a test pin on a regular basis. Any dirt in the bore can be removed with a nylon cleaning brush. • The clamping function can be tested quickly and easily using the test pin. • Insert the test pin into the clamping bore as far as the stop pin/stop screw allow. turn screw clockwise to a full stop • Tighten the clamping screw with a hex wrench as far as the limit stop testing bar by hand tightening. • The chuck is functioning correctly if the test pin cannot be moved by normal hand pressure. IMPORTANT Reducing sleeves are available; see page I3. Never tamper with the oil-loading orifice (sealed with a cap) as this could destroy the clamping ability of the hydraulic chuck and require it to be sent to WIDIA for service. In the event of small tool crashes or misuse of the chuck, please contact your Cleaning brushes are available; see page J5. local WIDIA Service and Repair Department to have your WIDIA hydraulic chuck serviced or repaired by qualified WIDIA service technicians. Test pins are available; see page J4. WWW.WIDIA.COM K63 Technical Information